

You are in the middle of a weekly hustle with your computer repair shop team. A technician pops the idea of adding custom PC building in your computer repair shop software. Due to their past work experience in custom PC building, they are willing to take full responsibility for the new revenue stream.
You discuss the idea with your team a little and try to answer the following questions:
- Is it profitable?
- Which hardware parts should we use?
- From where will we get computer components and parts at the best possible prices?
- How much warranty should we offer on each part?
- Lastly, is it worth the time?
Well, the weekly hustle comes to an end and you are unable to decide whether to invest in custom PC building or not.
Driving home from work, you can’t stop thinking about custom PC building and finally decide to explore it further.
What you find may surprise you.
In this article, we will be providing you all the necessary details that will prompt you to start custom PC building. By the end of this article, we are sure you will no longer have any doubts.
But before that, let’s come to the most critical question that will lay the basis of your new vertical.
What Is Custom PC Building?
Opposite to pre-built computers, a custom-built computer is customized to meet the specific needs of the customers.
Computer repair shops build computers for video and photo editing, gaming, web browsing, animation, and productivity needs, etc.
Various components of the PC are prioritized based on the functions required by the customer. Therefore, individual components such as CPU, graphics card, motherboard, and case are usually bought separately to get the best prices and save money.
These components are sorted by functionality, price and evaluated for compatibility with other components. Then these components are purchased from various computer parts suppliers.
For instance, you are building a PC that excels in playing high-end video games now and for the next couple of years. For that, you need a great GPU, i.e., a graphics card. This is to help your customer enjoy popular titles at the highest graphical settings.
Additionally, the custom-built PC should upgrade to an RTX 2080 to support HD or 4K that will be in future titles. The budget for such a PC can be $2,000, including the license for Windows 10. It’s not cheap, but it allows your customer to get something good that will last a lifetime. And it will enable you to differentiate your computer repair shop from your competitors.
So, with that bit explained, now let’s analyze the reasons that will entice you to offer customer PC building through your computer repair shop software.
8 Reasons Why You Should Offer Custom PC Building?
People are crazy about purchasing custom-built PCs. They prefer it more than purchasing new ones. So, it makes sense to give the customers what they want.
Below are 8 reasons why you should offer custom PC building.
1) Increase Your Computer Repair Shop Revenue
By offering custom PC building, you will be able to earn far more than your usual repair shop revenue.
Computer customization services are the first things that customers look for before purchasing a new computer. Once you start offering custom PC building, you can charge an extra fee or up to $50-100 on every system, depending on Custom Computer Building Packages. The price charged may vary based on how extensive the customization is and whether physical labor is involved.
The more detailed the work is, the more you can charge. But keep in mind not to overcharge your customers. It will give rise to a bad reputation for your brand, affecting your overall repair shop profits.
Another source of revenue is the RBG lights. You can add this unique feature to the PC to make it more attractive. Customers nowadays want RGB lights installed for aesthetic and comfort purposes. Hence, allowing you to earn more.
Lastly, you can design cases according to the customer’s taste and earn a few extra bucks from that.
2) Allows For Easier Upsells
When you build a PC, you know exactly where every part of the system goes and how to install it. So if the customer wants to replace something or add something, it will be easier for you to do that.
Making such changes in a pre-built PC is more time-consuming as you have to open it up and figure out the placement of parts.
Plus, upgrading components on a custom-built PC is cost-effective, making it a win-win for you and your customer. If a customer purchases a custom-built, they will want to come to you for upgrades so you will be able to earn more.
3) Fulfill The Demand for Better Cooling Systems
One of the problems people face in pre-built computers is that their cooling systems are not efficient, particularly for gamers. These pre-built computers are built on assembly lines and are jam-packed with components in a limited space. Thus, restricting the airflow.
Either they don’t have enough fans, or the cables hinder the airflow. Sometimes both can happen. In custom PC building, you have the advantage of selecting a case that is good for cable management and fans.
Even in mid-range builds, find a case that allows you to place 2-3 fans. When the cooling system is functioning correctly, the airflow makes the components last longer, thus keeping the customer happy in the long run. And it makes you stand out from your competitors.
4) Provide High-Quality Parts For Customer Satisfaction
Additionally, you can incorporate high-quality parts that will make you stand out from your competitors. Some PCs are high-quality simply because of their brand reputation and their logo. So, the components are not always the best.
These big tech giants mostly use low-quality components like optical drives, RAM, power suppliers, hard drives, and other parts. The reason for opting for cheaper parts is that they are usually looking for the lowest bid, thus maximizing their profits.
If you get into custom PC building, use high-quality parts to provide the best product to your customers. However, getting the correct price of components can be tricky.
For that, write all the components required for the build-in on an excel sheet. List down the components in on column on the left side. Then across the top row, list down all your vendors. Under each vendor, fill out the price of every component.
This trick will help you list down and tally all the prices. So go with the one that is offering quality at a reasonable price.
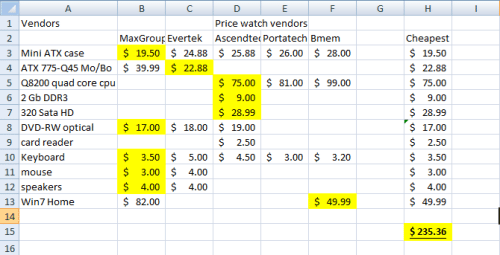
Pro-Tip: Check the compatibility of parts. In custom PC building, usually, it happens that one part, let’s say the motherboard (chipset), is not compatible with the RAM. So check with the vendor for optimum results.
5) Opportunity to Provide Better Warranties
The pre-built computers usually come with a year-long warranty. Mostly these warranties are on the entire PC. Now it may sound nice, but it’s an inconvenience if something starts acting up.
Whereas in a custom-built PC, you will be getting all the components individually. Most top parts suppliers provide lifetime warranties on parts. So, in return, you can give your customers a more extended warranty on parts or a lifetime warranty if that suits your repair shop.
It will ensure customer satisfaction leading to more potential customers in the future.
6) Customize PC’s According To Customer’s Needs
Building a computer means having complete control. For example, you can pick parts based on the usage of the customer.
The components that you can customize are:
- Graphics card
- Memory
- Case
- Optical Drive
- Power Supply
- Processor
- Motherboard
- Mouse
- Monitor
- Keyboard
- Mouse
- Speakers
For instance, a customer wants a PC built for graphic designing. So you will need a good graphics card. But, on the other hand, if someone wants to use it just for writing and checking emails, then a normal graphics card will do.
So, this way, the price will vary according to the need. And the customer won’t need to pay a hefty amount for something they won’t even use. Thus, ultimately giving them the power to only pay for what they want. This autonomy is not possible in pre-built PCs.
7) Earn More By Charging For Setup And Delivery
Offering free setup and delivery is never a good option unless the customer comes to pick it up themselves.
In the beginning, you will be selling high-quality systems at very competitive and reasonable prices. You can charge a reasonable amount for setup and delivery to fill that gap because it is also time-consuming.
For instance, you can charge a $50 fee for that. Don’t charge too much because it will be a deal-breaker for some customers. People are usually willing to pay more for the product, but not for the delivery fee.
So, price it accordingly.
8) Establish Concrete Vendor Relationships
Since you will require parts and tools for your new vertical, it will help you establish a good relationship with your vendor. You can also use the existing vendors in your computer repair shop software.
Always purchase your products in bulk to get suitable discounts. When you give more business to the vendor, they are willing to provide you special discounts on parts and tools. Use that to your advantage. It will help you earn more profits.
Key Factors to Consider in Custom PC Building
As mentioned earlier, knowing what the PC will be used for can help determine the specifications.
To help you kick start this new vertical, here is a list of standard specifications required for each PC. Then, you can further customize it by adding more components to it.
1. Storage Size
The storage size includes the number of files, programs, and other media your customer can install on your PC. Storage size is measured in Gigabytes (GB) or Terabytes (TB). The more the number, the more storage capacity on the PC.
All the data is stored on the hard drive (SSD or HDD). You can easily upgrade it, so it’s not so important at the initial purchase. Other possible solutions, such as external or cloud storage, also helps mitigate the storage gap.
2. CPU Power
The power of the processor or CPU is directly related to the power of the PC. The processor power is calculated in different ways. The most commonly used is clock speed measured in Gigahertz (GHz).
To put it simply, the bigger the number, the more power the processor has. And modern CPUs have a 3-4GHz average speed.
3. GPU Power
Just like the CPU, the GPU or the graphics card has a crucial role in determining the power of the machine. You can measure GPU strength through clock speed.
However, there is another equally imperative specification to pay close attention to. Video RAM or VRAM is the amount of memory in GPU. It directly links to how powerful it is. And like other components, the bigger the number, the more influential the GPU has.
4. RAM/Memory
Random Access Memory (RAM) is the part that stores the data presently being used by the PC. Therefore, you can conveniently upgrade the size of RAM in the PC. However, there are certain limitations.
The size of RAM you plan to upgrade is dependent on the motherboard. The more RAM the PC has, the more things the PC can do. Modern PCs usually have 8-16GB of Ram.
So, when building a PC, ensure that the motherboard supports the size of RAM you want to add.
5. Power Supply
The power supply is also known as PSU. It is the unrecognized champion of usage and functionality for a PC.
Just like other machines, each piece of hardware requires power. So the PC is no exception. Without the proper power supply, the parts won’t work at their full potential.
Picking the proper power supply is dependent on what the use of the customer will be. For instance, gaming needs more power than the average PC.
So, find the correct PSU that is compatible with the extensive needs of the PC. Since every build has its requirements depending on the customer’s preference, it’s crucial to consider the rail-specific power and overall wattage.
Additionally, to assemble everything, you will need some repair tools.
8 Essential Tools For Custom PC Building
Some tools will make your life easier. We have listed some essential tools for custom PC building below:
1. Screwdrivers
PCs are held together with the help of screws. Luckily, mainly Phillips-head screws are used in all kinds of PC.
So, the first screwdriver you need to get is a Phillips head screwdriver with a huge bit. It will be helpful to dodge stripping the head. Also, a longer shaft will help you keep the handle from coming in the way when dealing with tight spaces. For the second screwdriver, you will need a shorter one for the same reason.
Thirdly, get flat-bladed screwdrivers. They will help you get extra leverage when you are trying to pry things apart.
Fourthly, get a hex driver. It will help you with hexagonal motherboard standoff screws or other CPU cooler screws.
2. Anti-Static Equipment
Anti-Static equipment will come in handy for solemn PC assembly. Also, while working with parts of a PC, there is a possibility of electrostatic discharge. So for that, it’s wise to use anti-static equipment.
Many products can eradicate electrostatic discharge, such as an anti-static mat. Place it on the floor of your workstation because it will allow unrestricted movement. However, it can be a little expensive.
Repair shop owners with a low budget can use an ESD wrist strap. A wrist strap is just a wire that gives direct skin contact to the ground. Clip it to any grounded object or just simply plug it in the ground socket of a wall outlet. The best part is, it’s available just for $5.
Better safe than sorry.
3. Light Source
PC cases have a lot of shadows. And screws usually roll into the dark corners. So instead, get a bright desk lamp with a pose-able and long neck.
Additionally, you can also use a headlamp for direct illumination. It is a useful tool that always points in the correct direction. And you won’t require an extra hand to grab it.
You can also use a flashlight, but then you will have to multitask. So, pick the kind of light that you are most comfortable using.
4. Zip Or Twist Ties
Cable management is very important to limit dust accumulation and keep the airflow high. Plus, it makes things look neat.
For that, use zip ties to keep the cables in place. Cables that can be moved in the future can be tidied with black twist ties. These are invisible and way easier to remove.
5. Pliers
Unluckily, at times, the heads of cheap screws are stripped. When it happens, the only option at that time is to use pliers very carefully.
So, get a needlenose plier as they come in handy for many purposes. These usually include a wire cutter as well. Use it to snip the extra off of cable ties.
6. Extra Screws
PCs are held together with two kinds of screws: Low and high thread count. The low thread-count “6-31” screws are very common and keep side panels in one place. They are also used to stick graphics cards to the case’s back and attach any internal case pieces.
On the other hand, high thread-count “M3” is not so standard. These are used to attach internal drives like SSDs, HDDs, and other optical drives. Add both kinds of screws to your toolkit, along with longer sharp-threaded screws needed for fans.
Neatly keep all sizes in separate boxes, so you don’t have to jump into the pile of screws every time. It will allow you to save time by working efficiently.
7. Thermal Paste
Many CPU coolers have a thermal paste patch already applied. And some even come with spare packets. But how will you know if it’s high-quality or fresh?
So, swab off the given thermal paste and apply a fresh layer. It will ensure its softness and show that the correct amount is used.
A tiny tube of thermal paste can go a very long way for a casual builder. So, you won’t have to buy another one.
8. Rubbing Alcohol
To clean old thermal paste and other PC components, use rubbing alcohol. It’s a strong solvent that dissolves grime.
But note that it evaporates rapidly and doesn’t leave any residue or cause corrosion. It makes it perfect for wiping down other metal contacts inside the keyboard or any other place.
Lastly, give sufficient time to it for drying before putting thermal paste. It usually dries within seconds or a minute.
Conclusion
Starting your new vertical in custom PC building can seem quite challenging in the start. But it’s not something that you can’t do. You just need to get your head in the game.
So if you are still twiddling with the idea of adding custom PC building in your computer repair shop software, do not hesitate. Start one today and take advantage of this growing market.


